“Open informal space for the family to gather at the heart of this 1800's home was created by filling in a dilapidated indoor pool and constructing an addition above it. Features and details respect yet build upon the integrity of the original antique home."


Taking the Plunge In Reverse
New Canaan, CT
What do you do with a 1800's home with a tiny kitchen and a dated 70's indoor pool addition?
On the lower level, fill the pool in and create guest quarters and a sunny playroom.
Above the former pool, create room for a gourmet kitchen and mudroom by adding on.
Optimize and revitalize, while keeping the historic character.
An indoor pool addition had been built in the 70's. No provisions had been made to manage humidity generated by the pool and this excess humidty was creating problems for the whole house.

We explored the option of restoring the pool and installing a humidity control system in the home, but it was costly.
Our clients decide that this was not the best possible use of their remodeling budget, and made the decision to have the pool filled in and repurpose the space for mixed family use.

Filling in the pool gave space for a playroom with adjoining flexible space that can be used as a guest suite along with an en-suite bath, or as an exercise room.
A new open staircase will lead down to the lower level mezzanine.
On this lower level, there is more closet storage, including a huge walk-in closet, a fresh appealing laundry room, and space for a future wine cellar.

Atop the pool was a woefully undersized kitchen, family room and a leaking deck.
The clients wanted a chef's kitchen for two: one that better integrated with the family room. They also wanted to improve the entry and have a mudroom.
Adding an addition gave us an opportunity to improve the architectural lines as well

The kitchen will be expanded, and placed alongside the great room, so that the two spaces will work well together.
The side entry will be relocated, allowing us to carve out some space for a mudroom and an easily accessible set of stairs to the lower level.
The mudroom will have built-ins as well as ample closets for coats.
We even found room to shoe horn in a walk-in pantry off the new kitchen.

In the existing kitchen, there's very little counter space, too little storage, and certainly no room for two people to cook together.
The appliances dwarfed the space, and the cabinets were dated.

The only access into the house from the driveway is through the door on the right. There's no coat closet, and no place for our clients to dump their stuff when they come in.

The lower level guest room and en-suite bath layout necessitated eliminating the two sliding doors on the face of the pool addition.
We popped in a couple of windows and filled in the grade. This allowed us to create a way to get from the deck to the lower level's walk out patio.
A new staircase was added and descends from the deck to a flagstone walkway on top of the filled in space near the guest bedroom windows. From here, new flagstone steps lead to the walk out patio.

Atop the pool addition, you can see the old gable and shed additions that housed the old family room and tiny kitchen.
On the lover level are the sliders that we will need to take out in order to install the guest bedroom windows.

Reworking the roof lines meant removing the old awkwardly placed balcony seen atop the kitchen's shed dormer in this photo.
The old door and window will be replaced with an arched window that features a period correct, Gothic arched grill pattern. It will be centered under the shed dormer that is above it to improve symmetry and balance.

Here is the area that we will be filling in so that we can make a pathway from the upper deck to the lower patio.

On the left, the side entry will be relocated to allow for a new mudroom, and finished off with a landing and roof above.
We will be replacing all of the window sashes with energy efficient versions. This will allow us to retain all of the original moldings inside and out, giving us the ability to keep "the historic look" of the home.

On the right, the pool originally had a series of five extra tall sliders that opened to a sunken patio.
Two sliders, referenced previously, were on the right end and were eliminated to allow for the install of two windows for the guest bedroom.
The remaining 8 ft. sliders were replaced with standard height sliders with detailing to make them look like they have always been that way.

Here are those extra tall sliders, ready for removal to bring the space down to scale and increase weather-tightness.

Construction Begins
Here's the pool - Ready to go away!

We removed one of the sliders in order to get the machine in to break up the pool.

The machine just fits through the opening.

A hydraulic hammer was used to break up the pool.
The pool had to be broken into pieces. If we did not do this and the water table rose, the pool would rise up as well.

Starting to break up the pool surface.

You can see the dirt underneath as the base is broken up.

Close up of pool bottom being broken into pieces.

Once the base was broken up, fill dirt was added.

Gravel was added on top of the fill dirt as a base for concrete.

Rebar was then drilled into the sides. This ensured that after time passed, the concrete would not drop after it was poured.

Now the pool is completely filled in.
After the concrete gelled we used a power trowel to smooth the surface. This puts a proper finish on it.

After we had a solid working floor, demolition of the ceiling began.
Doing it in this order was so much easier and more efficient than trying to manipulate ladders over a 10' deep uneven pool floor.
As we demolished the ceiling, we discovered extensive black lumber and rot.
A Professional Engineer was called in to evaluate the structure and make recommendations for our clients.

While we waited for the engineers recommendations, we framed a floor atop the concrete in order to be able to insulate the space and have somewhere to run the ducts and pipes.
Since the ceilings were 12 to16 ft high, it wasn't like we needed the extra height.

Where the sliders were removed, temporary walls were required to hold up the ceiling.

Typically sliders and doors are raised up a few inches from the grade outside, so that you "step down" when you step out through them.
In this pool addition they had been built flush to the patio. We built them up with concrete block to preclude future water incursion.

So that the facade would look more original, we filled in the top of the openings with masonry to provide for more standard height slider openings.

Here's where the guest bedroom windows will go.
Note that the concrete block has a "brick pattern' so it will look like painted brick rather than concrete block when it is done.
After the wall was built it was waterproofed.

Then, as a "belt and suspenders" practice, plastic was added over the waterproofing materials.
We'll do everything we can to keep the house watertight!

This area was backfilled. Next we reset the old flagstone, creating a new walkway to the backyard.

The mason is making the steps from the back patio to the side. These will be faced with flagstone.

The flagstone faced steps are now complete.

And then a classic wrought iron rail was added.

Here we are digging a trench so that we can run the electrical and propane lines for the generator.

A big hole was needed to bury a 1000 gallon underground propane tank.

Lowering the tank into place.

Positioning it exactly.

Now it's in place.

Man and machine work together to cover up the propane tank.

We are just about finished filling in the dirt around the propane tank.

A concrete pad was poured to provide a stable base for the generator.

The generator is now in place. It has settled in place and the flowers are blooming. Note how they match the Generac logo!
More importantly, this generator is big enough to run the entire house, so power outages will be never be an issue for the clients.

Once the masonry work was complete, demolition of the family room began.
The engineers recommendations included replacing the whole ceiling at the deck end of the pool addition, and sistering up the joists closest to the original house.

Here is an example of a joist being sistered up where the original was rotten.

This is where the additon connected to the house. There was extensive rot here as well.

Demolition is now complete! Here we are looking into the kitchen.
We were able to retain the ceiling and outside wall of the great room, although we had to remove the entire roof structure.

Here, the ceiling of the lower level (aka the floor of the kitchen) has been removed for replacement. This gives you a birdseye view of the ducts running across the floor on the lower level.

The rotten materials have been removed. The lower level of the home is now open to the sky.

Another view of the lower level after all demolition is complete.
Here are the materials we are going to use to re-frame the damaged areas and restore their integrity.

The whole ceiling of the lower level was replaced.
Here you can see the ring beam circling the perimeter.
Peeking inside, on the lower level, gives you a view of the newly raised interior walls.

With the structural work out of the way, the subfloor was put down in the kitchen.

Now we go back to the lower level to begin the insulation process. Here the insulator is preparing to spray closed cell foam into the floor.

Closed cell foam was used for two reasons. First, fiberglass insulation would have absorbed the moisture created by the concrete floor's temperature differential with the room, and second, to avoid having a "cold" floor, which is typical of a concrete room.

The insulator is done for now, but will return after the rough mechanicals are complete to spray insulation into the walls.

At this point, the floor is down, interior walls are laid out, framing materials are in place and we are getting ready to frame the interior walls.

Work on the lower level HVAC is underway.

The interior walls are going up; here you see the door to the guest quarters.

The guest quarter framing is nearing completion.

HVAC ductwork is being done on the wall on the right. There is a view of the mechanical room straight ahead.
The clever layout of the space eliminated the need for unsightly soffits to disguise the steel I beams that traversed the ceiling without reducing the ceiling height.

Here is the guest room with its windows cued up for installation.

This is where the steps that descend from the mudroom to the lower level will be installed.

Now we're back to the upper level at the addition where the kitchen perimeter wall is in place.

With everything open, it was important to keep things dry at night. Massive tarps did the trick.

The site is covered well on all sides insuring things stay dry at night.

Taking a look underneath the tarp, we see the interior walls of the kitchen and great room are taking shape.
This view is from the kitchen to the great room. On the left there will be a pass through. The cabinetry will be installed between the two walls.

The walls of the addition are framed and insulation is being installed that will provide a cushion for the EPDM roof above it.

The insulation is being installed, and you can also see the deck posts which are in place.

The ceiling joists are in place in the great room. The deck has been trimmed out and the EPDM roof is complete. It's starting to look like a house again!

The new sliders are being installed in the openings on the lower level.

Upstairs, the great room and kitchen walls have been framed. Here you can see the recess for the TV in the great room. The controls will be housed in a cabinet in the kitchen, keeping it sleek and simple on the great room side.

In the kitchen, the bay window and window seat have been framed.
In the middle where the island will be located you can see where the plumbing has been roughed and is ready for the island sink to be installed.

Pictured here is the mudroom and the relocated door to the outside and the covered porch.

The roof has been covered with builder's felt and is awaiting the cedar shingles that match this detail on the antique home.

First, ice and water shield is applied directly on top of the plywood. This provides a watertight surface. Next, there is a cedar breather installed on top of the water shield. This allows for air movement under the shakes, giving them a longer life.

Cedar shakes are being installed.

The new sunroom doors with sidelites are installed.

The new siding is installed on the addition.

The siding is now complete.

Back on the lower level, the walls are being insulated with closed cell foam.

Here is a close-up of the spray foam insulation being installed.

This is what the walls look like after the spray foam is complete.

The tile installer is creating a "mud" (concrete) base in the shower for the shower tile.

Once the framing is complete, and the rough mechanicals and insulation are done, the sheetrock can be installed.

The sheetrocking phase continues.

Here's the pass through after sheetrocking.

After the sheetrock is finished, tile installation begins in the lower level playroom.

Of course, it is important for the tile to be installed straight. A string is run to make sure that it stays straight across the room, and great care is taken positioning it.

Here is the completed tile floor.

Steps down to the lower level have been installed. A hand rail will be installed on the right, but is not there yet.

The lower level is covered in rosin paper and is now ready to paint.

Painting is underway. The floors have been carefully covered to protect them.

And here is a very bright yellow for the laundry room.

Cabinets are being installed, and await finishing details and counters.

Counters installed the way the kitchen was designed.

Granite counters are installed.

Here is the finished pass through.

The mudroom floor has been tiled.

The counters are installed, but covered so that they don't get damaged while the finishing details are completed.
The appliances have been installed and it's starting to come together.

The backsplash has been completed with carerra marble tile. It looks classic, with a little pattern to it, giving it some interest, without being "in your face".

Trim has been added to the window seat.

Painting the kitchen addition

On the outside, the deck with its rails.

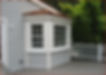
Here's the outside of the kitchen. The window seat is within this bay window with its cedar roof.
Trex has been used on the steps.

The sunroom doors are done.

Here are the new steps off the back deck going down to the backyard, with Trex decking.

The lower level steps have been completed and painting is underway.

Here's a modern floating vanity for the bathroom.

The shower is now complete.

Floating shelves adjacent to the shower will be very convenient for towels and baskets of toiletries.

Now it's time to finish the hardwood. You can see the squares of stained floor samples at the end of the island used to select the final flooring color.

From the mudroom, you can see the floor finishers at work.

Here they are screening the floor.

While much of the flooring work can be done with a big machine, the edges are done by hand. Good quality prep work is essential for good results with the final finish coats.

The finished hardwood in the great room, appropriately looks great!

The finished floor in the kitchen and great room with the sun making patterns on it.

Here's the finished window seat.

The island features butcher block recessed into the counter and a farm sink.

Here's a shot of the mudroom floor.

The steps down to the mezzanine with the new handrail.

A stone landing makes the stairs more interesting than they would have been if they were "all wood".

Here, at the base of the stairs, the combination of wood and stone looks great.

A final challenge was to replace over fifty windows with new energy efficient versions while preserving the various original case moldings found in the different additions that had been built over 150 years ago.
Rather than doing full replacements, we replaced just the sashes.
Simulated divided lite grills were ultimately chosen and look historically appropriate for this new England classic.

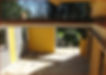
From the backyard, you can see the kitchen/great room addition built atop the former indoor pool addition. On the lower level, a guest bedroom, playroom and en-suite bath replace the pool.
Squaring off the addition allowed for a 'ski slope' roof line bringing it back in line architecturally with the rest of the home.
A new staircase from the upper deck that leads down to a slate pathway giving easy access to the backyard and the lower level patio.

The new covered side entry porch leads into the new mud room.
By relocating the side entry, we were able to carve out some space for this mudroom area, and fit in an easily accessible set of stairs to the lower level.

The new covered mud entry on the side is just steps from the driveway and detached garage. The stone flooring will hold up to years of muddy shoes and snow covered boots. The custom built in storage bench and shelves keep gloves, scarves and the like organized and within reach.
Building on clues from the original styling led to a kitchen and mudroom that is a felicitous pairing of old and new. The cabinetry and trims, with an abundance of traditional detailing, molding and pilasters, feel fresh and classic at the same time.

Classic inset style white painted cabinetry, chosen for its neutrality and broad appeal, contains custom furniture style details such as arched toe valances, beaded side panels, as well as decorative corbels at the island and the mantle style hood.
Contemporary lighting fixtures, whimsical window coverings, (on order) and pops of color make this classic kitchen feel fashion forward in an antique home.

It's a truly functional kitchen.
A charming window seat allows for casual family meals while the island stools lend themselves to quick snacks.
A large built-in cutting board next to the sink and directly over the pullout trash bin makes rinsing and chopping of vegetables a breeze.

This large pass through between the kitchen and family room serves as bar, buffet and homework spot away from the island and kitchen table.

On the family room side, a couple of stools provide an ideal homework station.
By matching existing fir floors and mimicking existing moldings, the new section blends seamlessly with the old original areas of the home. The addition of a large dog has aided in aging the new floors to blend in further with the original flooring.

And here's the family room. It's a much warmer space now that we have insulated the walls and ceiling and replaced the windows. Lighting changes make it feel more cozy.

On this side you have a good view of the new addition, the deck and other improvements to the lower level that were made.

Perhaps, the best feature of the interior reconfiguration is the location and design of the new stairs that go from the mudroom to the lower level. The elimination of the awkward dark stairs and fear of bumping your head makes an inviting entrance to the lower level.
As a bonus, the fact that the client's children can come and go from the side entry without needing to pass through the main living areas will help keep the peace in the house.
As you go down the stairs, there's a lower mezzanine, with storage, and room for a future wine closet.

Here's the lower level playroom. In the distance you can see the guest quarters. Any sign of the former pool is gone from sight.
The repurposed lower level adds quality space to the home; dark dank spaces have been replaced with open, bright rooms full of custom features not often found in antique homes.
The lower level is a flex space, and can be used in limitless ways. The owners opted to tile the lower level playroom floor as they envisioned their young son using the space to ride his bicycle indoors. It will work just as well as an exercise room or as a family room.

The guest quarters are bright and sunny, with an en-suite bathroom. The French doors will allow this space to act as a future office or work-out room should future owners not wish for another bedroom.

The new bath, with its' contemporary design, feels like a day spa.
The en-suite bath was purposely designed in a contemporary style and boasts a huge shower to enjoy after taking a turn in the sauna. While mixing in contemporary details and finishes, in a traditional home doesn't always work, a good balance between classic and fresh touches was achieved on this project.

Here's the new and bright laundry area. We had removed a duct that ran across the window, replaced the window, and relocated the stairs that came down into this room, so it is much larger and sunnier now.
Even the former laundry room received a fresh update. The tile floor replaced dingy carpet. A bright yellow wall and one wall of blackboard paint makes this space a pleasant one in which to spend time while doing laundry. The original door that led to the former pool space now accesses a bonus space that will act as storage and wine cellar.

The clients are thrilled with how the spaces flow seamlessly together, both inside and out.
This house reminds them of former homes they had lived in and loved, separately and together all around the world. So they feel right at home here, with the best of old and new, feeling as if they have been here all along.


HOBI Award Winner
for Best Conversion (of the pool into living space)
Recognized for design ingenuity, best craftsmanship and consumer value.
"Respecting the old without feeling like you are living in your grandmother’s house while mixing in contemporary that doesn’t feel out of place was a challenging balance that we felt was achieved in the design and finish materials. Any doubts we once had in eliminating the pool have long dissipated as the new living space offers something for everyone."

Happy Client
New Canaan, CT