“Significant work was done to renew and strengthen this much loved home. An eye for integrating historic details into the repairs brought it gracefully back to its 16th century roots, garnering a Historical Preservation Award for our clients."


Bringing Back A 1720's New Canaan Home
(New Cannan, CT)
For the current owners of the Seth Weed-Chapman-Martin house, the second oldest house in New Canaan, what started out as a straightforward siding and window replacement project grew to include complex structural repairs. Once opened up, severe rot and structural instability were discovered. The framing had to be replaced and re-worked from the foundation up to strengthen this much-loved historic home. Antique beams and attention to detail make the home look as it did hundreds of years ago.

This is the original 1720's portion of this home.
At one time the Weed Family owned about 500 acres and this particular property until the early 1920’s. Prior to that sale, it was remodeled and modernized, changing the home’s original identity completely; the beams were covered, the fireplaces bricked up and an ugly addition added on front.
The new owner, Mrs. Chapman, made it her mission to restore the home to its original state, creating an authentic example of an early American dwelling.

Mrs. Chapman added a new wing, with a garage, den, and bathroom, making the home livable in our modern sense without destroying the charm of its antiquity.
In the 1950’s the home was sold to Mr. and Mrs. LeRoy C. Martin, who had an intense interest in early Americana. and a choice collection of antique furniture. They cherished the authenticity of the home and added a sunroom and great room extension on the back.
The current owners have continued the tradition of cherishing and restoring the home to its original condition.

It’s not easy to see, but if you look closely you may notice a bulge in the side of the home around the lower left window.
This bulge was the first indication, prior to starting the home improvements, that there may be hidden structural problems.
Construction Begins

Due to the age of the home a lot of lead based paints had been used over the years. We used lead-safe work practices to safely remove the painted materials as required by the EPA to lead contaminants while renovations are underway.
Suits and respirators are used by the workers for their safety, to prevent exposure.

Caution tape, warning signs, and copious amounts of plastic are used for other people’s safety.

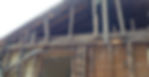
As the siding demolition progressed, the framing of the home became visible.
It became apparent that there were some serious structural problems due to rotting wood and insufficient repairs in the past.

The corner post (seen to the right) was almost completely rotted through and was starting to buckle from the weight of the roof above.

The beam that holds the second floor framing in place had completely rotted through and fallen apart.

At this point, after uncovering extensive rot as well as discovering post beetles in some beams, it was determined that a Professional Engineer should be contacted to inspect the house for the Murrays and provide a plan to restore the home's structural integrity.
He needed to prepare detailed drawings of the extensive structural work that was required to put the house back together.

With rain coming, and the engineer working on the drawings, we buttoned up the house tight to protect it from the weather and animals.

Once we received documentation from the client's Professional Engineer, we were able to start on the path to restore this once beautiful home's framing.
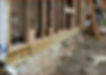
First, the majority of the floor joists, accessible from the basement, had to be replaced, as there was damage from insects and rot. You can see the first few joists being replaced to the right.
After this necessary reframing was completed, we replaced the sill plate, side wall, and beam.

Temporary supports were put in place to support the home upon removing the sill plate.
Additionally, temporary electric service was installed so that the home would have electricity for the duration of the work.

The new sill plate was installed per the engineering specification.

More temporary supports and a temporary interior wall were put in place to support the home while the new wall was built.
A new 2x6 wall was constructed, the beam replaced, and the corner post replaced, all using conventional lumber.
With this area now structurally sound, the challenge of returning the interior to its original condition had to be addressed.

Because the beam shown earlier was rotting, the 2nd floor joist beams had started to fall out of the pockets in the main beam. This resulted in the wall being pushed out (causing the bulge we originally noticed.)
To make this room look as authentic as the first day it was built we needed to create a wood veneer that would hide the fact that conventional lumber was used in the repairs.

We searched near and far for a matching antique beam we could use for the veneer.
Eventually we found an antique hand-hewn oak beam; originally from a barn in upstate NY, that was a perfect match.

A slice of the beam was cut at a mill and was installed as a veneer. This required the carpenters to precisely notch out for each and every beam so that it could be slid into place.

Once in place, custom made plugs of the same beam were used to cover the bolts holding it in place, so it truly looks like it has always been there, and that it was installed before the beams.

The second challenge of restoring the interior appearance was reproducing the gunstock corner post, which is an original feature of the home's framing.
We were able to carefully cut the rot from the original post and re-install a portion of it to create the illusion that the post is still in its original condition. This is truly a work of art!
You can see the "Before" and "After" pictures of the post.

Once the right side of the house was fixed up we moved to the front where we had to remove the rotted sill plate to replace it, in accordance with the engineering detail.

With the sill plate removed, the area was cleaned to accept new framing.

In addition to replacing the sill plate, the studs needed to have the rot cut out of them and be reinforced as shown in this engineering detail.
With the sill plate replaced and the studs strengthened, the front of the house was ready for sheathing and insulation.

Fiberglass insulation was blown in through holes that were drilled in the sheathing. Wood plugs were used after insulation to close the holes.

After the insulation was done, a house wrap was applied to act as a moisture barrier, protecting the sheathing and framing.
In addition, new Anderson Series 400 windows were installed, and low maintenance composite trim applied around them.

Once the front was complete, we moved on to the left side of the original portion of the home and opened it up.
Significant rot was discovered in this area as well which required reframing and replacement of a main beam.
As with the other areas, the sill plate here had to be replaced and the foundation rebuilt, as it had crumbled with age.
Temporary supports were put in place to hold the side of the house while this work was done.

After the foundation was rebuilt the sill plate had to be replaced using the same engineering detail as seen previously.

With a solid foundation and sill plate below, the workers carefully removed all the rotted beams and studs.
Great care was used in their removal so as not to damage the plaster walls inside.

Moving from the ground up, the wall was reinforced and beams replaced as needed.
The new framing had to be cut out over the existing to reinforce what was remaining. This work was exacting, tedious, and time consuming, but it was the right way to do the job.

With the reframing of the left side complete the sheathing and insulation could be installed.

The home now had solid, well insulated, framing so it could be closed up with a low maintenance concrete siding product called Hardiplank.

Now that the entire original section of the home was completed it was time to move on to the back.
Much like the front, rot was found in the back on the sunroom.
The EPDM roof had been leaking and had almost completely compromised the structural integrity of the room.

As you can see on this corner of the sunroom, the framing had completely rotted out leaving very minor amounts of wood holding the roof up.

All of the rotted wood was removed as was the sheathing from the roof.
The roof was reinsulated and all the rotted framing replaced.

Finishing touches were done on the new EPDM roof while simultaneously installing siding and exterior trim.

Luckily, no significant rot was found on the exterior of the great room so a new moisture barrier was installed along with new siding and exterior trim.

With the whole house sided, trimmed, and insulated it was time for the finishing touches.
Seamless aluminum gutters were made and installed on the home.

Everything is complete. The grills for the windows at the front of the house were custom ordered to match the house’s original style.

Here you can see the back of the completed house.
All the double hung windows were replaced and the large picture window in the great room was replaced with a more historically correct set of four casement windows.
The house is finished and was returned to its original condition.
Here is a shot of the whole back of the house.
Note the addition to the original structure on the right that was done by the previous owner. (This is the garage etc.)

With everything complete and a happy client, this structurally sound, energy efficient, low maintenance home is ready to weather another few hundred years.
We would like to give a big thank you to the Melissa Murray and The New Canaan Historical Society for assisting us with our research on the history of the Seth Weed-Chapman-Martin House.

This project garnered our clients a Historic Preservation Award from the New Canaan Preservation Alliance in recognition of their “fine execution of preservation practices and especially their unwavering commitment to an ambitious and daunting restoration project.”
"Kudos to the Clark team; we were able to comfortably live in our home and go about our daily lives while Clark Construction made extensive structural repairs all around us.
Their attention to detail and special touches make the home look as it did hundreds of years ago. We are thrilled with the final result - a structurally sound, energy efficient home, ready for another century or two."

New Road
Ridgefield, CT